Preparing for international travel? How intensively you need to plan depends on your destination, your familiarity with international travel, and your anticipated activities. On this page, you'll find some things that everyone should do to prepare for a safe and healthy time abroad.
Travel Documents
Make sure your passport is valid and that you have obtained the proper visas before you embark on your trip. Depending on your circumstances, you may also be required by your destination country to provide additional immigration documentation, including proof of vaccination (e.g., Yellow Fever, etc.). In addition, if you are not a United States citizen, you may need some specific documents to re-enter the U.S. after your trip. The information below will assist you with this step.
-
Your passport should be valid for at least six months after your anticipated return date and needs a minimum of two or more blank pages. Otherwise, some countries may not let you enter.
It can take more time than you expect to obtain a passport or a visa. If you need a new passport or need to renew your old one, apply as soon as you can for it. You should also apply for a visa early to avoid delays or disruptions in your travel.
-
Each country's visa, passport, and vaccination requirements are different and depend on your citizenship, the reason for travel, length of stay, country of trip origin or transit, and the number of entries required. Entry and exit requirements for all countries can be found in the country-specific information provided by the United States State Department.
Make sure to obtain the proper visa prior to traveling. Conducting research or teaching under a tourist visa could jeopardize your ability to return to your destination in the future. Consider the nature of your activity to assess the type of immigration documentation needed. The Study Abroad office or partner institutions will provide visa guidance upon acceptance to a program.
Once visa requirements are known, schedule Embassy appointments and complete paperwork promptly. You can find contact information for foreign embassies at this link.
NOTE: Foreign embassies are located in the capital of each country. For example, the Embassy for the United Kingdom is located in Washington, D.C.. Consulates, which offer the same services, are located in major cities in each country. The list above will provide locations for embassies and consulates.
If you are an international student or scholar, you should always consult international student service advisors at the Office of International Students & Scholars before leaving the United States to ensure you can return to the U.S. without incident. For example, if you have a single-entry U.S. visa and you plan to return to the U.S., you will need to obtain a new U.S. visa while you are abroad.
-
The following may also be needed for visa appointments and program requirements:
- Proof of return ticket.
- Medical Insurance (for pre-existing and every day medical issues)
- Non-Study Abroad: Emergency Contact Information card
- Study Abroad: Emergency Contact Information card
- International SOS Member card
- Certificate of Insurance
- Acceptance to a study abroad program (when applicable)
- Digital and physical copy of itinerary
If you're required to show proof of evacuation, repatriation or emergency health insurance coverage in order to obtain a visa or other travel document, reach out to the International Travel Health & Safety office (internationaltravel@lmu.edu) with your full name as it appears on your passport, travel dates, countries involved, and name of program or purpose of travel.
Managing Money Abroad
When you travel abroad, you will need to think about the overall cost of your program, but also how you will handle your money while in another country.
-
First of all, it is important that you don't just rely on one way to access money or pay for things while you are abroad. So our first suggestion is that you have at least two ways to access money. This could be a debit/ATM card and a credit card, local currency and a credit card, etc. We hope that the next sections will provide you with some helpful information!
-
Let's start with the most basic form of payment: cash. Depending on where you study abroad, you could be paying in Euros, Pounds, Australian Dollars, Thai Baht, or Ugandan Shillings. The first thing you need to know is what currency you will be using. Secondly, some countries are still very much cash societies, meaning most transactions will be in cash. This will be covered in your pre-departure orientation or you can feel free to ask your study abroad advisor. This information will be good for you to know as you plan how you will access your money while abroad.
Ways to get cash
- Your bank: See if your bank can order you some foreign currency prior to you leaving. It can be a relief to arrive in the country already having at least $100 worth of the local currency on hand. Please be aware your bank wil likely charge you a fee for this service and it is best to give ample notice (2 weeks or more). Smaller banks may not be able to provide this service, and likewise less common currencies may not be available through your bank.
- The airport: While at international airports, you will typically see currency exchange offices. This will allow you to change US dollars, for example, into Japanese Yen. Some of these offices will claim that they do not charge a commission. Theoretically, they might be telling the truth, that there is no separate fee/commission for exchanging the money, instead they usually use an exchange rate that favors them more than it does you. You can ask them for a quote and compare that with the "real" exchange rate by doing a Google search or using a currency exchange app such as XE. Less common currencies may not be available.
- ATMs: Likely a common way you will access local currency is by using the ATM. You can even visit the ATM as soon as you arrive at the airport in your study abroad country. ATMs will often offer a variety of languages, especially if the ATM is located is located inside an airport. The ATM will ask you how much of the local currency you would like. Be aware of your daily ATM withdraw limit, plus the fees your bank charges for an international ATM withdrawal. In addition, the local ATM may assess you a fee as well. For safety reasons, when possible, we suggest using an ATM that is located inside a bank rather than on the street.
- Coins: Some countries have coins that are actually worth something! For example, the 2 Euro coin and 2 Pound coin can be worth $2-$3 depending on the exchange rate. Use your coins up while abroad. Do not bring them home with you unless you plan to add them to your coin collection. US banks will rarely be willing to exchange your coins from abroad.
-
One of the forms of payment you bring with you abroad will likely be your home bank ATM/debit card. It provides a convenient way to withdraw money from your home bank account while you are abroad. Be sure to talk to your bank before you leave and let them know you will be abroad and plan to use the card. Many banks allow their customers to set up these travel notifications online or through their app, but you may like calling in order to ask questions. While you have your bank on the phone, it is a good idea to confirm the international ATM withdrawal fee. Some banks charge a percentage fee such as 3%, while others may charge a flat fee such as $5. Other banks will charge both a flat fee and a percentage for every ATM withdrawal you make while abroad. Also ask your bank about your daily withdraw limit and then convert that dollar amount into the currency you will use abroad so you know the maximum you can withdraw at one time. Finally, ask your bank the fee for using your card as a credit card for purchases in stores.
If you have an account with any of the banks below, you may use their ATM’s while abroad without an ATM fee as part of the ATM Global Alliance.
🏦 Participating bank
🌍 Countries with ATMs
Bank of America
United States
BNP Paribas
France, Italy
Deutsche Bank
Germany, Poland, Spain, India
Scotiabank
Canada, Mexico, Chile, Peru, Caribbean Islands
TEB Turkish Economy Bank
Turkey
UKRSIBBANK
Ukraine
Westpac
Australia, New Zealand, Pacific Islands
-
- Credit cards can also be a convenient way to make payments abroad, though they may not be accepted in all countries.
- If you know credit cards are widely accepted in your study abroad location, it is best to get a credit card that charges no foreign transaction fees as this will save you money in the end.
- As with an ATM/debit card, you will also want to notify your credit card company of your intentions of using the card abroad, so they do not block charges or freeze your card due to expected fraud.
- Some credit cards have features through their app that notify you each time a purchase has been made, or they ask you to verify that you made the purchase.
- Credit cards are convenient, but you should still plan to stick to a budget and make sure you are able to pay your card off each month so that your charges do not accrue interest.
- Some credit cards may also offer you a sign-up bonus of points, miles, or cash back.
-
Some locations will have the option of paying via Apple Pay and/or Google Pay for example. This can be a safe and convenient method of payment; however, it is difficult to know just how much you will be able to use these payment methods until you arrive in country.
-
The links below will assist you in budgeting for your trip abroad.
-
There are many apps that can make your life easier while abroad. Below are a few suggestions:


 XE
XE
Research Your Destination
Engaging with your host community and culture is central to the abroad experience and to the discoveries that you will make about yourself and your host country. But remember: the level and depth of interaction that you will have with the local culture will depend largely on your own initiative, and the process starts long before your arrival in your host country.
Having some knowledge about your host country will make you better equipped to interact with your local environment in a substantive and meaningful way. Having a basic understanding of the history and geography of your host country as well as social, economic, and political systems will help you build relationships with local people and better understand the cultural dynamics you will experience. The more informed you are about the environment in which you will be living and studying, the more likely you will be to question assumptions or misconceptions you may have about the place and people, to understand and cope with differences between your expectations and the reality you experience and to represent yourself, LMU, and your home country well.
Besides basic Internet searches, consider watching a movie from or about your host country, reading a novel or non-fiction work about the place you are visiting, reading articles from local newspapers online, and buying a travel guide that points out the major sights and attractions in the area where you will be living. Below are some tips and resources to help you get started.
-
- Every country has unique customs and legal systems.
- For example, certain dress codes, behaviors, or alcohol laws may differ significantly from what you're accustomed to in the U.S.
- Be sure to familiarize yourself with these rules to avoid misunderstandings or legal trouble.
-
- Familiarize yourself with cultural etiquette, including greetings, public behavior, and tipping practices, to show respect and connect with locals.
- If you belong to a specific group, such as a religious minority, ethnic minority, or the LGBTQ+ community, research local attitudes and laws, as some countries may have restrictions or discriminatory practices.
-
- Check travel advisories from the U.S. State Department. Learn about any safety concerns, such as high-crime areas, political instability, or health risks.
- Enroll in the U.S. Department of State’s Smart Traveler Enrollment Program (STEP) to receive safety alerts from the nearest U.S. embassy.
- You can access updated Travel Alerts on International Travel website.
Packing Tips & Resources
Keep reading for a list of packing essentials, tips to avoid overpacking, and even what items should be left at home.
-
Clothing Essentials
- Pack clothing appropriate for the weather and culture of your destination.
- Check local norms—what's considered casual in the U.S. might be too informal in some countries.
- Don't forget to pack a good pair of walking shoes and a rain jacket.
Travel Documents, Electronics & Prescription Medications
- Keep important documents—like your passport, visa, insurance information, and emergency contacts—in your carry-on luggage.
- Electronics, including laptops, should also be packed in your carry-on to avoid damage.
- Carry at least one month of prescription medication in your carry on.
Security Items
- Consider packing a money belt or hidden pouch to protect your passport and cash.
- If you'll be staying in hostels or shared accommodations, pack a small lock for added security.
TIP: Leave valuable or irreplaceable items, like expensive jewelry or sentimental keepsakes, at home to minimize the risk of loss or theft.
-
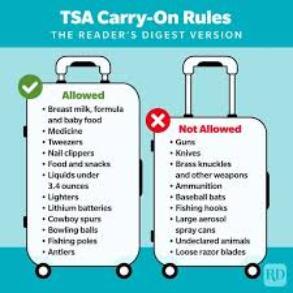
As per TSA's website, planning ahead and packing properly can facilitate the screening process and ease your travel experience at the airport. Know what you can pack in your carry-on and checked baggage before arriving at the airport by reviewing the lists at this link. Even if an item is generally permitted, it may be subject to additional screening or not allowed through the checkpoint if it triggers an alarm during the screening process, appears to have been tampered with, or poses other security concerns.
-
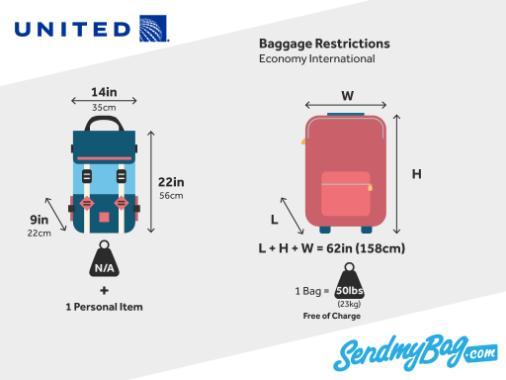
Check with your airline. The below is general guidance for international flights. If you plan to travel within Europe or domestically within a country (e.g., within Australia), make sure you have another bag or backpack that meets the domestic or internal European size requirements.
-
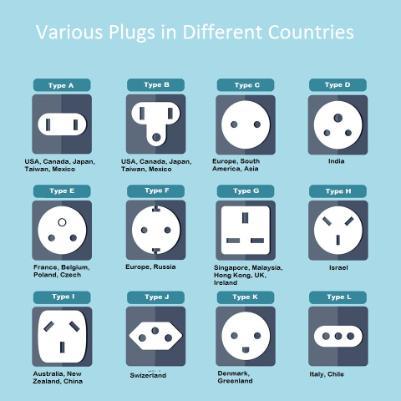
The standard voltage for electrical outlets in the United States is 120 volts (V). This has been the official standard since 1984, though the term 110 V is often used interchangeably.
Voltage varies between countries and without a converter, you will ruin your device and possibly damage the electrical circuit in your accommodations. It is best to leave electric shavers, hair dryers, and straighteners at home. You can look on the back of your device to determine its voltage.
It is important to know that adaptors only change the plug configuration. If your device is only 120, you will need a converter to plug it in to convert the power. Some devices, like laptops, already have a converter built into it and will need an adaptor only.
If possible, purchase a universal adaptor/converter to use. They are widely sold in the U.S. and can be found at Walmart, Target and Amazon. They can also be purchased once you are in country.
Staying Connected
The following information will be a good resource for you while you are abroad and covers everything from how to use your cell phone (cheaply), dealing with emergencies abroad, to communicating with the folks back home.
-
How will you use your phone?
- Research before you leave whether it's best to purchase a local SIM card upon arrival or to sign up for an international phone plan with your current provider. Some countries offer affordable prepaid SIM cards with data, which can be a great option.
- Electronic SIM cards are also an option.
- Ask other students who have been on this program or in this location.
- Many cities offer free public Wi-Fi, but be cautious when using unsecured networks.
Resources
-
Establish a communication plan with family and friends before you leave and stick with the plan or inform those people if it changes. Otherwise, you may find yourself being hunted down by police because you told your mom you’d Facetime her weekly and it’s been 8 days since last contact.
- How will you communicate? What means (e.g., Facetime, WhatsApp, etc.)
- How often will you communicate?
- What to do in an emergency (from your side; from their side)?
- Leave a copy of your Emergency Contact Information Card with your family and friends.
- Study Abroad: Emergency Contact Information Card
- Non-Study Abroad: Emergency Contact Information Card
-

Preparing for Your Flight
You've chosen your destination, done your research, packed your bags, and made a communication plan with your family—now you're ready to go! The resources below will help ensure you're fully prepared for your journey and ready to board that flight!
-
Definitions
Checking in
Checking in for a flight is the process whereby a person announces their arrival at the airport. The check-in process at airports enables passengers to confirm they will be on the correct flight, obtain a boarding pass, possibly select their seat (if hasn't happened already and is allowed by airline), and check in luggage onto a plane, if desired.
Boarding pass
A boarding pass is a document provided by an airline during check-in giving a passenger permission to board the airplane for a particular flight. At a minimum, it identifies the passenger, the flight number, and the date and scheduled time for departure. Boarding passes are always required to board a flight. Often, airlines accept either paper or electronic boarding passes (on phone or tablet).
Three Ways to Check In
1. In-person at a staffed check-in counter at airport
Items needed for check-in counter:
- Passport (when traveling internationally)
- Flight information
- Paper ticket (less and less common), OR
- E-ticket with a confirmation number—usually sent via email if ticket is purchased online or through a travel agency, OR
- Printed itinerary with a confirmation number
2. In-person at the airport using a self check-in kiosk
If using a kiosk, you can select a seat (if hasn't happened already or allowed by airline), enter the number of bags to be checked (if desired), and print boarding passes. You will then need to bring your luggage to a staffed counter or checked luggage station. Airline staff will need to check your passport either at the time of check-in or at your gate.
To check in at a kiosk you will need one of the following:
- Confirmation number (usually sent via email if ticket is purchased online or through a travel agency)
- Credit card used for payment of the ticket
- Passport
3. Online check-in before arriving to the airport
You can usually check in online starting 24 hours before departure. If checking luggage, you will need to bring your luggage to a staffed counter or checked luggage station once you arrive at the airport.
Benefits of online check-in:
- Avoid potential check-in lines at airport
- Print boarding pass at home (can also wait or reprint at self-service kiosk at the airport)
- Select seat assignment(s) before others (if applicable)
- Choose to get updates of possible changes to departure times leading up to flight
Time Management
Most airlines list their specific check-in policies and timelines, so visit your airline's website for details.
Check-in deadlines
- Many airlines have a deadline for passengers to check in before each flight. Check-in deadlines are usually between 60 to 30 minutes before boarding, and you are often not able to check in after those times (meaning you cannot go on your flight).
- Check-in deadlines allow airlines to load luggage onto the plane, offer potential unclaimed seats to stand-by passengers, and to finalize documentation for take-off.
Boarding timelines
- International flights often start boarding 45 minutes to 1 hour prior to the departure time.
- Your boarding pass will list the time the flight will start boarding.
- Flights tend to board in shifts—they might call by rows or by groups. Your boarding pass will indicate your row or group.
Flight Preparation
Airports are busy places with lots of intense activity happening in tight quarters. It helps to know ahead of time what to expect.
- Check your flight status: On the day before your flight and again a few hours before you leave your house on the day of your flight, check the status of your flight online on your airline's website. On their homepage, look for a "flight status" link. If your flight is delayed, you can adjust your timing accordingly. If your flight is canceled, you should contact your airline to make other arrangements.
- Make sure you have all of your essentials: Before leaving the house, double-check that you have your passport, your wallet, and either your plane tickets, or your reservation/confirmation number.
- Leave with more than enough time to get to the airport: For international travel, a good rule is to arrive at the airport 3 hours prior to your flight. Take into account the time it takes to get through the check-in line, to pass security, and then to walk or ride (tram, bus) from the check-in area to your boarding area (your terminal and gate listed on your boarding pass).
Once You Arrive
Getting through the airport can take several hours at some airports or during busy travel times of the year. On international flights, you will need to account for more time to clear immigration and customs.
Follow the instructions given to you by your host institution and/or program coordinator as to where to go after you clear customs and immigration.
-
- Wear comfortable clothing.
- Place one copy of your essential documents like passport, credit cards, etc in your carry-on and one in your checked luggage. Might be a good idea to leave a copy (digital or paper) with family.
- Bring the following in your carry-on:
- Hand sanitizer or wipes
- Face mask.
- rRe-usable water bottle.
- Neck pillow, eye mask, and compression socks.
- Light jacket or sweatshirt
- Pen
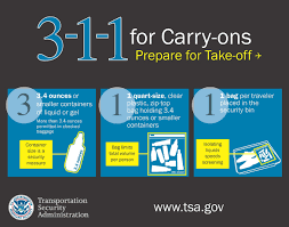
- Toiletries (< 3.4 oz liquids/gels)
- Change of clothing.
- Charging cord for phone and headphones/ear buds
- Prescription medications (all if you have space; otherwise, bring 1 month's supply)
- Download course material, books, and/or entertainment.
- Ensure you have your arrival instructions from your host institution or program coordinator.
-
- Keep phone, wallet/purse, passport, and travel documents in a safe place.
- Keep toiletries handy.
- Have a pen handy to complete entry forms.
- Drink plenty of water.
- Get up, stretch, and walk around periodically.
- Use compression socks.